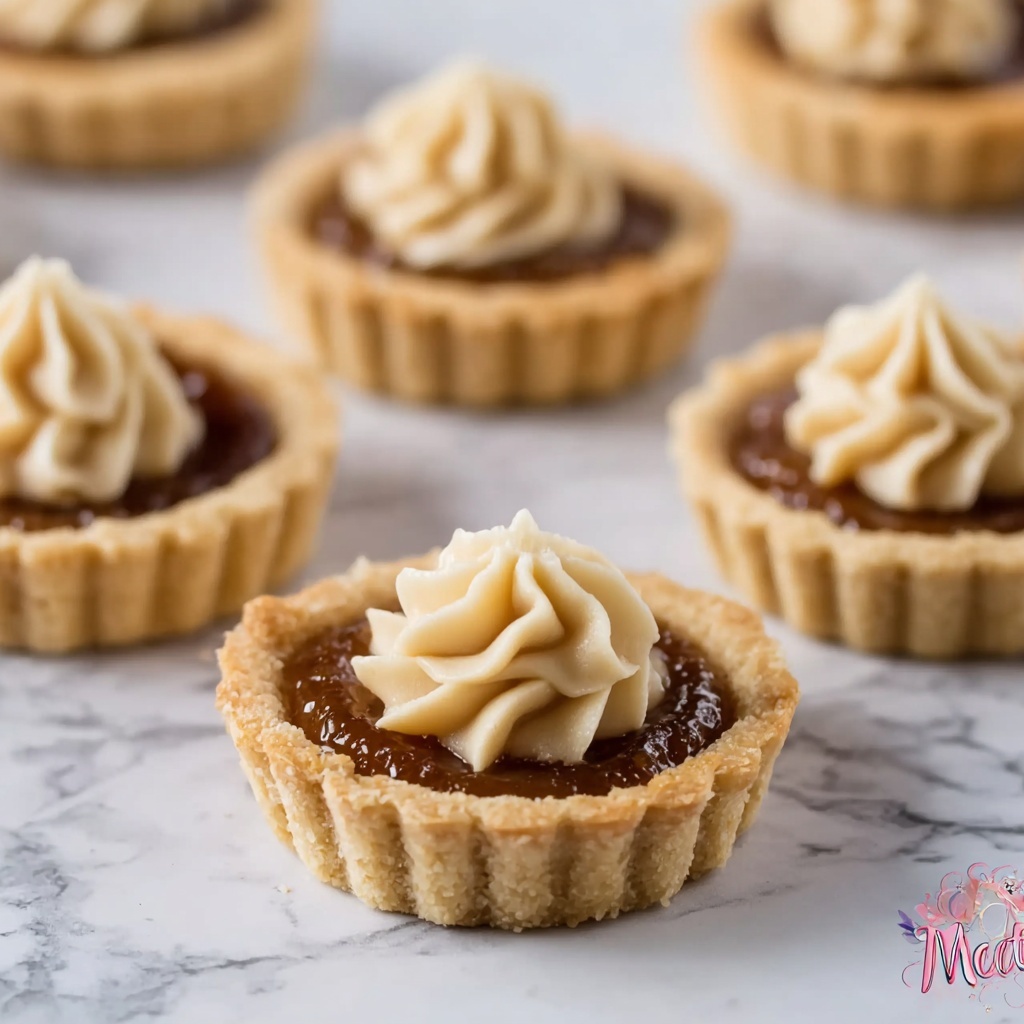
If you are on the hunt for a dessert that is both charming and utterly delicious, these Easy Mini Fruit Pies a Crowd-Pleasing Bite-Size Dessert Recipe delivers in every way. Perfectly portable and bursting with juicy, flavorful fruit wrapped in flaky, golden crusts, these mini pies are the ultimate sweet treat for any gathering. Whether you pick apples, berries, or stone fruit, the balance of sweetness and a dash of spice creates an irresistible bite-sized delight that will have guests coming back for more. Plus, they are surprisingly simple to make, combining the best of home-baked goodness with the convenience of pre-made crusts if you prefer.

Ingredients You’ll Need
This recipe calls for simple, wholesome ingredients that work together beautifully to create a perfect harmony of taste, texture, and color. Each component plays a crucial role in bringing those mini pies to life, from the flakey crust to the luscious filling, ensuring a stunning dessert every time.
- Pie crust: Use 2 standard 9-inch crusts, store-bought for convenience or homemade for extra love and flakiness.
- Fruit filling: 2 cups of diced apples, berries, peaches, or pears offer a vibrant burst of natural sweetness.
- Sweetener: 1/3–1/2 cup granulated sugar, adjusted to the sweetness of your chosen fruit for perfect balance.
- Thickener: 1.5–2 tablespoons cornstarch to keep the filling luscious without running.
- Flavor boosters: 1 teaspoon vanilla extract, 1 teaspoon lemon zest, and 1 tablespoon lemon juice brighten the fruit flavor beautifully.
- Spices: Optional 1/2 teaspoon ground cinnamon or cardamom and a pinch of nutmeg add warmth and depth.
- Butter: 2 tablespoons of cold butter cut into cubes to dot the filling, enhancing richness and texture.
- Egg wash: 1 beaten egg mixed with 1 tablespoon milk or water to give the crust a gorgeous golden glaze.
- Coarse sugar: Optional topping for an extra sparkle and delightful crunch.
How to Make Easy Mini Fruit Pies a Crowd-Pleasing Bite-Size Dessert Recipe
Step 1: Prep Your Pan and Oven
Start by preheating your oven to 375°F (190°C) and lightly grease your standard 12-cup muffin pan or line it with paper liners. This ensures the mini pies will pop out easily once baked and makes clean-up a breeze.
Step 2: Make the Fruit Filling
In a bowl, combine your chosen fruit with sugar, cornstarch, lemon zest, lemon juice, vanilla extract, and spices if using. Stir everything together until the fruit looks glossy and coated, then let the mixture sit for 5 to 10 minutes. This resting period helps the fruit release its natural juices and melds all the flavors perfectly.
Step 3: Roll Out the Crust
On a lightly floured surface, roll your pie dough out to about 1/8 inch thickness. Using a 3 to 3.5 inch round cutter or a drinking glass, cut 12 rounds to fit as the pie bottoms. Gather the scraps and re-roll carefully to ensure you have enough dough for all your mini pies.
Step 4: Fit the Crust into the Pan
Gently press each dough round into the muffin cups, making sure the edges come up the sides nicely to hold the filling. Place the pan in the fridge for about 10 minutes to chill the dough, which helps prevent shrinking during baking.
Step 5: Fill the Pies
Fill each dough-lined cup with the fruit mixture, leaving a small gap at the top. Dot the filling with little cubes of cold butter to add richness and a silky finish once baked.
Step 6: Top Your Mini Pies
Cut smaller rounds or fun shapes like hearts or stars from the remaining dough for the tops. You can also fashion thin lattice strips if you want a classic look. Remember to add vents if you cover the pies fully so steam can escape during baking.
Step 7: Brush and Sprinkle
Brush each top generously with the egg wash to achieve that irresistible golden shine. If you like, sprinkle coarse sugar on top for an extra sparkle and delightful crunch.
Step 8: Bake
Bake the pies for 18 to 24 minutes, until the crusts have turned a stunning golden brown and the filling bubbles merrily beneath. Rotate the pan halfway through the baking to guarantee an even bake and prevent hot spots.
Step 9: Cool
Let your mini pies rest in the pan for about 10 minutes after baking. This little pause allows the filling to set up, making it easier to remove the pies without losing any filling.
Step 10: Serve
Carefully loosen each mini pie from the pan and transfer to a wire rack to cool completely or serve warm. These bites are divine on their own or paired with a small scoop of vanilla ice cream for that extra special treat.
How to Serve Easy Mini Fruit Pies a Crowd-Pleasing Bite-Size Dessert Recipe
Garnishes
A simple dusting of powdered sugar or a dollop of whipped cream turns these mini pies into a show-stopping dessert. Fresh mint leaves or a drizzle of honey make for lovely, natural touches that elevate presentation and flavor.
Side Dishes
Serving your mini fruit pies alongside a scoop of creamy vanilla ice cream or a rich custard sauce creates a comforting and decadent experience that will impress any guest. A fresh fruit salad or light citrus sorbet could also provide a refreshing balance to the sweet pastries.
Creative Ways to Present
Display your Easy Mini Fruit Pies a Crowd-Pleasing Bite-Size Dessert Recipe on a tiered cake stand to create a festive vibe perfect for parties. Wrapping each pie in parchment or presenting them in individual mini pie boxes adds a thoughtful touch, making them perfect for gifting or take-home treats.
Make Ahead and Storage
Storing Leftovers
Once cooled completely, store leftover mini pies in an airtight container at room temperature for up to two days or in the refrigerator for up to four days. This helps maintain their flaky crust without getting soggy.
Freezing
If you’d like to enjoy these anytime, freezing is an excellent option. Wrap each cooled mini pie tightly in plastic wrap and then place in a freezer-safe container or bag. They freeze well for up to three months, making meal prep or hosting quick and easy.
Reheating
To reheat, thaw refrigerated or frozen mini pies at room temperature, then warm them in a preheated oven at 350°F (175°C) for about 10 minutes. This method revives the crust’s crispiness and warms the filling to perfection without drying them out.
FAQs
Can I use frozen fruit for the filling?
Absolutely! Frozen fruit works well when thawed and drained properly to avoid excess liquid. Adjust the sugar and thickener amounts accordingly to balance moisture and sweetness.
Do I have to use store-bought pie crust?
Not at all! Homemade pie crust adds a personal touch and can elevate the pies even more. However, store-bought crusts save time and still yield fantastic results.
How do I prevent the crust from getting soggy?
Chilling the dough in the muffin cups before baking helps prevent shrinking and sogginess. Also, using cornstarch as a thickener improves the filling’s consistency, reducing excess moisture.
Can I make these mini pies vegan?
Yes! Use a vegan pie crust, swap butter for a plant-based alternative, and use a flax egg or non-dairy milk for the egg wash to keep the pies entirely plant-based and delicious.
What is the best way to serve these pies for a party?
These mini pies are perfect bite-sized treats for parties. Serve them warm or at room temperature on a decorative platter, optionally accompanied by whipped cream or ice cream for an extra indulgent touch.
Final Thoughts
There is something so joyful about sharing these Easy Mini Fruit Pies a Crowd-Pleasing Bite-Size Dessert Recipe with friends and family. Their simplicity, delicious flavor, and charming size make them a truly special treat that fits every occasion. I can’t wait for you to try making these yourself and watch everyone delight in every scrumptious bite!
Print
Easy Mini Fruit Pies a Crowd-Pleasing Bite-Size Dessert Recipe
- Prep Time: 15 minutes
- Cook Time: 20 minutes
- Total Time: 45 minutes
- Yield: 12 mini pies
- Category: Dessert
- Method: Baking
- Cuisine: American
Description
These Easy Mini Pies are the perfect bite-size dessert, combining flaky pie crust with a delicious fruit filling. Quick to prepare and versatile, you can customize the filling with your favorite fruits like apples, berries, or peaches. Ideal for parties and crowd-pleasers, these mini pies bake to golden perfection with a sweet, buttery touch.
Ingredients
Pie Crust
- 2 standard 9-inch pie crusts (store-bought or homemade)
Fruit Filling (choose one or mix)
- 2 cups diced apples (peeled), or
- 2 cups berries (blueberries, strawberries, raspberries), or
- 2 cups diced peaches or pears
Sweetener and Thickener
- 1/3–1/2 cup granulated sugar (adjust to fruit sweetness)
- 1.5–2 tablespoons cornstarch (or 3 tablespoons flour)
Flavor Boosters
- 1 teaspoon vanilla extract
- 1 teaspoon lemon zest
- 1 tablespoon lemon juice
Spices (optional)
- 1/2 teaspoon ground cinnamon or cardamom
- Pinch of nutmeg
Additional
- 2 tablespoons cold butter, cut into tiny cubes (to dot the filling)
- 1 egg beaten with 1 tablespoon milk or water (egg wash)
- Coarse sugar for topping (optional)
Instructions
- Prep your pan and oven: Preheat your oven to 375°F (190°C). Lightly grease a standard 12-cup muffin pan or line with paper liners to ensure the mini pies don’t stick and are easy to remove after baking.
- Make the filling: In a mixing bowl, combine your chosen fruit with granulated sugar, cornstarch, lemon zest, lemon juice, vanilla extract, and optional spices like cinnamon or nutmeg. Stir well until the fruit is evenly coated and the mixture looks glossy. Let it sit for 5–10 minutes to allow juices to release, enhancing flavor and thickness during baking.
- Roll out the crust: On a lightly floured surface, roll your pie dough to about 1/8-inch thickness. Use a 3 to 3.5-inch round cutter or a drinking glass to cut out 12 rounds; these will form the bottoms of your mini pies. Save leftover scraps to reroll and cut additional rounds if necessary.
- Fit the crust: Gently press each dough round into the muffin cups, making sure the edges rise up the sides to hold the filling. Chill the muffin pan with dough lined inside for 10 minutes in the fridge; this step helps prevent shrinkage during baking.
- Fill the pies: Spoon the prepared fruit filling evenly into each crust-lined cup, leaving a small space at the top for the filling to expand. Dot each with tiny cubes of cold butter to add richness and a buttery finish to your pies.
- Top the pies: Cut smaller rounds about 2.5 inches in diameter or create shapes such as hearts or stars for a decorative partial top. Alternatively, you can use thin lattice strips to cover the pies, ensuring there is a vent for steam to escape if the tops are fully covered.
- Brush and sprinkle: Lightly brush the top crusts with the egg wash (beaten egg mixed with milk or water) to promote browning and a shiny finish. Sprinkle coarse sugar on top if desired to add sparkle and a delightful crunch.
- Bake: Place the muffin pan in the oven and bake for 18–24 minutes. Bake until the crust is golden brown and the filling is bubbling through the vents or edges. Rotate the pan halfway through baking to ensure even browning on all mini pies.
- Cool: Let the mini pies cool in the pan for 10 minutes after removing from the oven. Carefully loosen the edges with a knife or small spatula and transfer the pies to a wire rack. Cooling helps the filling to set, preventing spills when serving.
- Serve: Enjoy these mini pies warm or at room temperature. They are fantastic on their own or served with a small scoop of vanilla ice cream for a delicious dessert treat.
Notes
- You can use store-bought pie crusts for convenience or make your own for a homemade touch.
- Adjust the sugar quantity depending on the sweetness of the fruit you choose.
- If using berries, cornstarch is preferred as it helps thicken the juicy berries’ filling better than flour.
- Make sure to leave vents in the top crust to prevent sogginess and allow steam to escape.
- Mini pies can be frozen before or after baking; reheat before serving for best results.
- Use paper liners for super easy removal and cleanup, especially if serving at parties.


