
If you’re craving a cozy, hand-held snack that’s bursting with savory goodness, you’re going to love this Easy Tuna Rice Balls Recipe. These delightful little bites bring together tender, warm rice and a creamy tuna filling, wrapped in crisp nori for just the right amount of texture. Perfect for lunches, picnics, or when you want something quick yet satisfying, these rice balls have a nostalgic charm that feels like a warm hug from your kitchen. Once you try making them, you’ll see why they’re an absolute favorite for so many.
Ingredients You’ll Need
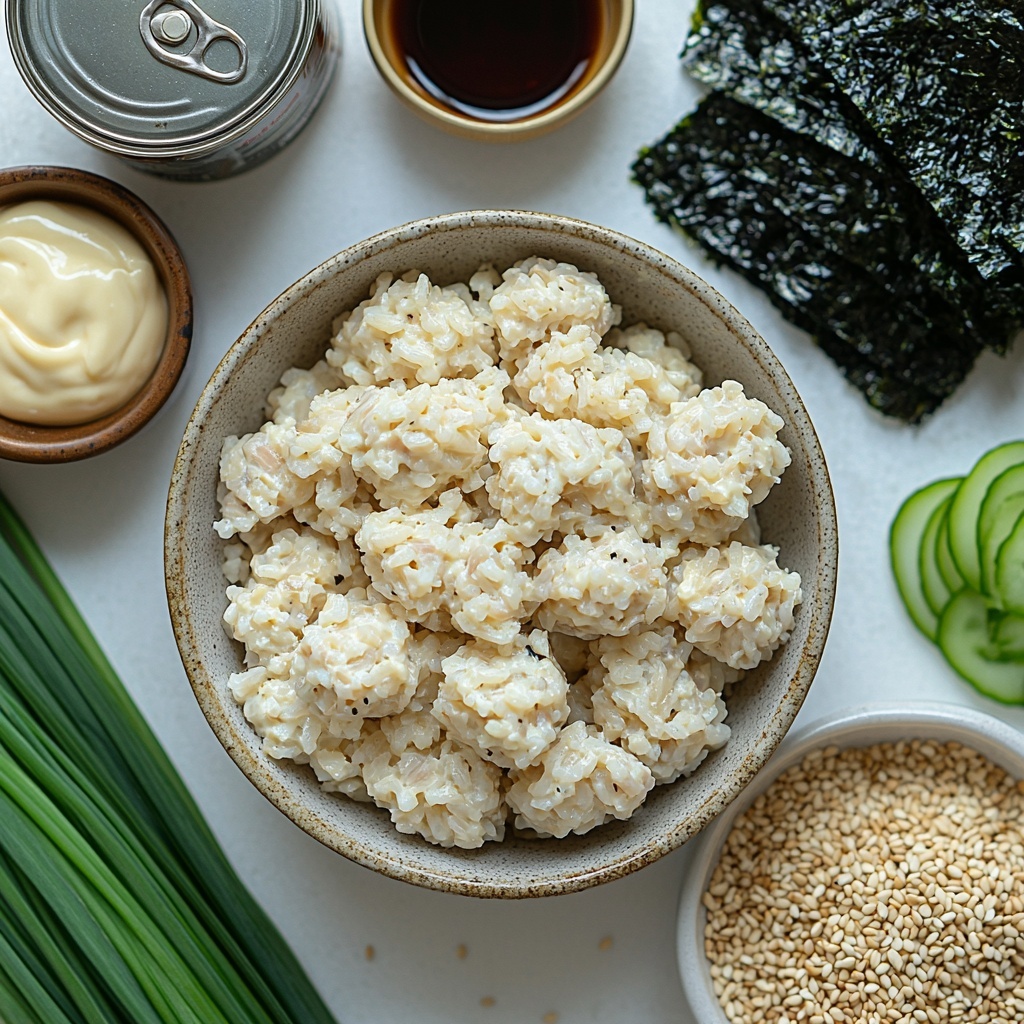
Gathering just a handful of simple yet essential ingredients, this recipe relies on each one to create the perfect balance of taste, texture, and color. From the fluffy rice to the rich tuna filling and the briny touch of seaweed, every component plays a key role in making these rice balls truly irresistible.
- 2 cups cooked short-grain rice: The sticky, tender rice holds the shape perfectly, creating a soft base for your filling.
- 1 can (5 oz) tuna, drained: Provides a protein-packed, flavorful center that’s creamy once mixed with mayo.
- 2 tablespoons mayonnaise: Adds richness and moisture to the tuna filling without overpowering it.
- 1 teaspoon soy sauce: Brings a savory depth and a gentle saltiness that brightens the tuna mixture.
- Salt, to taste: Essential for seasoning the rice and the filling just right.
- Nori (seaweed sheets), cut into strips or squares: Adds crispness and a subtle ocean flavor while acting as a handy wrapper.
- Optional: toasted sesame seeds: For a nutty crunch and a boost of visual appeal.
- Optional: sliced green onion: Gives a fresh, mild onion flavor and vibrant color contrast on top.
How to Make Easy Tuna Rice Balls Recipe
Step 1: Prepare the Tuna Filling
Start by mixing your drained tuna with mayonnaise and soy sauce in a small bowl, seasoning with just a pinch of salt. Stir everything until the mixture is creamy but not too wet; this ensures your filling stays nicely packed inside the rice without leaking out. This step is really where the delicious flavor base develops, so take a moment to taste and adjust if needed.
Step 2: Shape the Rice
Wet your hands with water and sprinkle a little salt on them to keep the rice from sticking and to lightly season each bite. Scoop about half a cup of warm rice into your palm and flatten it gently into a disk shape, ready to cradle that tasty filling.
Step 3: Add the Filling and Shape the Rice Balls
Carefully spoon about one teaspoon of your tuna mixture into the center of the rice disk. Then, gently fold the rice around the filling, pressing firmly to seal everything inside and shaping the whole into a ball, triangle, or oval – whichever form feels easiest and most comfortable for you to eat.
Step 4: Wrap with Nori
Press a strip or square of nori onto the bottom or side of each rice ball. This not only adds a wonderful sea flavor but makes holding and eating these convenient bites a breeze. The contrast of soft rice and crispy seaweed is part of the magic!
Step 5: Garnish (Optional)
For a little extra flair and texture, sprinkle the rice balls with toasted sesame seeds or finely chopped green onions. These little touches bring in more flavor layers and a lovely pop of color that makes the dish feel extra special.
How to Serve Easy Tuna Rice Balls Recipe
Garnishes
Adding garnishes like sesame seeds or green onion not only elevates the flavor but also makes them visually stunning. You can even experiment with a drizzle of spicy mayo or a few flakes of chili for a spirited twist that wakes up your palate.
Side Dishes
Pair these tuna rice balls with a fresh cucumber salad or pickled veggies to add a crisp, refreshing contrast that balances the creamy, savory richness of the tuna. A bowl of miso soup on the side would also complete a perfectly comforting meal.
Creative Ways to Present
Try arranging the rice balls on a decorative plate lined with shiso leaves or bamboo for a beautiful presentation that impresses guests or delights lunchbox recipients. You could also serve them with small dipping bowls of soy sauce, wasabi mayo, or ponzu to add interactive flavor fun.
Make Ahead and Storage
Storing Leftovers
If you have any leftovers, store them in an airtight container once they have cooled to room temperature. They are best eaten within one day if kept at room temperature or within two days if refrigerated to maintain freshness and texture.
Freezing
While these rice balls are best enjoyed fresh, you can freeze them if needed. Wrap each ball individually in plastic wrap to prevent freezer burn, then place them in a sealed freezer bag. Use within a month for optimal flavor, and thaw overnight in the fridge before reheating.
Reheating
To reheat, unwrap the rice balls and warm them gently in a microwave for about 30-45 seconds. This keeps the rice soft without drying out the tuna filling. Avoid overheating to maintain the perfect texture.
FAQs
Can I use other types of rice for this recipe?
Short-grain rice is ideal because it’s sticky and holds together well, but if you don’t have it, you could try sushi rice or even medium-grain rice. Just make sure it’s cooked so it sticks enough to form the balls without falling apart.
What can I substitute for mayonnaise?
If you want a lighter option or don’t use mayo, try Greek yogurt or a vegan mayo alternative. They both provide creaminess that binds the tuna nicely while keeping the filling moist.
Can I add other ingredients to the filling?
Absolutely! Feel free to mix in finely chopped pickles, corn, or a dash of hot sauce to customize the tuna filling to your liking. Just keep the mixture firm enough to stay inside the rice.
Is this recipe suitable for kids?
Yes, these rice balls are great for kids as they’re bite-sized and flavorful without being spicy. Plus, they make a fun, interactive snack or lunch item that kids can help shape themselves.
How long do Easy Tuna Rice Balls stay fresh?
For the best taste and texture, enjoy them the same day. If stored properly in the fridge, they’ll still be good for up to two days but might lose some softness and freshness after that.
Final Thoughts
There’s something truly special about the simplicity and comfort of this Easy Tuna Rice Balls Recipe. It’s the kind of dish you can whip up quickly, enjoy right away, and share with friends or family to create happy memories. Give it a try and let these little bites bring a warm, satisfying touch to your day – I promise they’ll become a treasured favorite in no time!
Print
Easy Tuna Rice Balls Recipe
- Prep Time: 10 minutes
- Cook Time: 0 minutes
- Total Time: 15 minutes
- Yield: 6 rice balls
- Category: Snack
- Method: No-Cook
- Cuisine: Japanese
Description
Easy Tuna Rice Balls are a comforting and nostalgic snack that brings the warmth of homemade meals to your table. These hand-shaped rice balls are filled with a savory tuna mixture, combining creamy mayonnaise and savory soy sauce, wrapped delicately with nori seaweed. Perfect for a quick lunch or picnic, these rice balls are both satisfying and simple to prepare.
Ingredients
Rice Balls
- 2 cups cooked short-grain rice (warm but not hot)
Tuna Filling
- 1 can (5 oz) tuna, drained
- 2 tablespoons mayonnaise
- 1 teaspoon soy sauce
- Salt, to taste
Wrap and Garnish
- Nori (seaweed sheets), cut into strips or squares
- Optional: toasted sesame seeds
- Optional: sliced green onion for garnish
Instructions
- Prepare the Tuna Filling: In a small bowl, combine the drained tuna, mayonnaise, soy sauce, and a pinch of salt. Stir gently until the mixture is moist but not runny, ensuring the flavors are well blended.
- Shape the Rice: Wet your hands with water and sprinkle a little salt on them to prevent sticking and season the rice ball’s surface. Take about half a cup of warm rice and flatten it gently into a disk shape in your palm.
- Add the Filling: Place approximately one teaspoon of the tuna mixture in the center of the rice disk. Carefully fold the rice over the filling, sealing it completely, and shape the ball into a round, triangular, or oval form according to your preference.
- Wrap with Nori: Press a strip or square of nori against the side or bottom of each rice ball to act as a wrapper, which will make handling easier and add subtle oceanic flavor.
- Garnish (Optional): Sprinkle the rice balls with toasted sesame seeds or finely chopped green onions for additional texture, flavor, and vibrant color.
- Serve or Store: Serve the rice balls immediately, or cool them completely before storing in an airtight container. For best quality, consume within one day if kept at room temperature, or within two days if refrigerated.
Notes
- Wet your hands before shaping rice to prevent sticking.
- Adjust salt to taste in the tuna mixture.
- Use short-grain rice for optimal stickiness and shape retention.
- Rice balls can be made in triangular, round, or oval shapes based on preference.
- Consume rice balls promptly or store properly to maintain freshness and food safety.
- Optional garnishes add color and texture but are not necessary.


